Sunday, 19 May 2013

Monthly Favorites - April/May


Now I know it's the middle of May but I wanted to do a post on a few of the products I've been loving the past couple of months and can't stop using! I've picked 8 things that I highly recommend you all check out, they are...


 1. Maybelline 'The Falsies' Mascara. Now those of you who watch Tanya Burr (Pixi2woo on YouTube) will know that this is her go-to mascara, after weeks of putting it off and staying loyal to my L'Oreal Telescopic I finally decided to just go for it and buy one. They cost £7.99 and can be found at all drug stores. I bought the one in 'Black Drama' which is their blacker-than-black version and I absolutely LOVE it! She meant it when she said it was amazing, thank you Tanya! I never normally go for wands that have a brush on the end, I much prefer plastic, but the shape of this one is curved to give an even application and it gives such amazing length to lashes especially ones like mine that have been beaten up over time! The formula is not too dry and not too wet and even after using it for ages it hasn't dried out or gone funny. I love finding such a gem product that's so cheap yet just as good as any high end product, especially when it's mascara!

2. MAC blusher in the colour 'Gleeful'. MAC blushers are £19 and can be found online, in MAC stores or in department stores. While £19 may seem a lot to pay for a blusher I always say that even though it's a lot to spend on one product, that one product will last you a VERY long time and will save you buying products of a lower standard that need replacing regularly and end up costing more. Think of it as an investment! This colour is a beautiful dark pink that gives you that natural flushes look. It's perfect for the winter, spring, summer and autumn it can be worn any time. It also has a gold pearl effect which is so nice and really brightens up your cheeks. It's my ultimate favourite blush and I've been wearing it every day this past month.


3. Maybelline nail varnish in the colour 'Mint for Life'. This is a perfect dupe for Essie's 'Mint Candy Apple' and is a snippet of the price, Essie polishes are £7.99 and this one is a very reasonable £4! I love this colour, it's a gorgeous pastel mint (very fashionable again this spring) and it's also a great base for nail art! I love the formula of this nail varnish, before this I'd never tried any maybelline nail varnishes but I will definitely get more! It needs 2 coats which I think is reasonable and it hardly chips after a week of wearing it! It's really shiny and pretty and perfect for spring and summer.


4. I bought this brush on a complete whim when I was in a MAC store (this is the reason I shouldn't go there in the first place!) It was priced steeply at £17 but it's one of those things that you buy and keep for the rest of your life, it's my favourite brush and I do not know how I survived without it to begin with! It's a crease brush and I use it to swipe a darker colour through my crease and in the outer corner of my eyes. It blends really nicely but doesn't make the colours go muddy unlike the brush I was using before this. My make up looks so much more precise than before but still really soft. Highly recommend as a good starter brush. Wish I'd gotten it sooner!


5. My hair is really disagreeing with this weather we're having in this country at the moment. If you know me you'll know that I don't like to get my hair cut and that usually results in split and damaged ends. My hair gets dry really easily especially when it's really cold and windy! The past couple of weeks the wind has been crazy and my hair has really suffered. I'm a sucker for drug store hair products, they're one of those things that I love to try but I don't like to spend a lot on. This is one of my favourite products I've tried and keep reaching back for this one after my showers. I spray this onto damp hair really focusing on the ends and then spray heat protectant over the top. I definitely think it works at combating dryness and any split ends I've got it takes care of. I definitely recommend this to anyone who has dry hair and a bonus is it's only £4.39 at Boots.


 6. Next is a complete luxury product. I bought this bubble bar from Lush because of its smell. It's called the 'Brightside' Bubble bar and it's a tie-dye block of orange and yellow. It smells of summer, the smell of citrus is so overpowering it just makes you happy. It's orangy-lemony goodness! And it's HUGE! I've had 3 baths out of this and I've only used up half so it's pretty good value for money at £4 considering you'll spend the same on a bath bomb that you'll only use once. You just break a chunk off and crumble it under the running tap and it makes huge mountains of bubbles as well as turning your water orange, and let's be honest, who doesn't want an orange bath?! Really reccomend this to those who like strong spring-like scents. I'm not one for subtle floral scents from lush I like the strong candy smells! 

7. Another smelly favourite. I got this perfume for Christmas it's 'ROSE' by Paul Smith, it smells like roses... obviously but not the old people rose smell it's really fresh and girly. Normally with perfume I'm more drawn to fruity scents but I fell in love with this when I first smelt it. It lasts on the skin for ages and is just one of those scents that you can wear everyday morning or evening. And the colour of the actual perfume in the bottle and the little pouch it came in is just so pretty I LOVE IT. I have worn this pretty much every day this past month.
8. I saved the best thing for last. It's my MAC palette. For those of you who are not that familiar with MAC products you basically buy an empty palette and fill it with colours of your choice. I've been collecting my colours for about a year now and got my palette in february. I finished it this month and couldn't be happier with it! It's one of the most expensive things that I own which makes me very protective over it! I'm already dreaming about starting a new one and what colours I'm going to put in it. I wanted to include this in my favourites because I use this every single day and love that you can choose the colours, there's a colour combination in there for literally any occasion. I think I will do another post solely on my palette and the colours, let me know if you'd be interested in reading that!

If you would like to know more about any of the products I mentioned either comment below or contact me on instagram or twitter, both @bethanvickery

I really recommend all these products, there's good reasons why I've been loving them and using them 24/7 this month!


Wednesday, 17 April 2013

Spring Cath Kidston inspired nails

Recently I've really gotten into nail art and I've tried to do some more difficult designs, I decided to replicate a floral Cath Kidston print and I got a lot of compliments on it so thought I would share how to do them here!

This is the print I chose however I did change it slightly!


To recreate this manicure you will need:
  • A light pink nail varnish
  • A medium pink nail varnish
  • A dark pink nail varnish
  • A white nail varnish
  • A green nail varnish
  • A pastel nail varnish for the base
  • A thin paint brush
  • And a dotting tool (if you don't have this you can use the paintbrush, a toothpick or even the end of the brush.


If you have the time and patience these nails are surprisingly easy to do!
Note: after each step it's reccommended that you wait for the nails to dry before starting the next step!

Step 1
Paint your nails two coats of your chosen pastel colour, the colour I used is called 'Tidal' by Topshop and I love it! 


Step 2
Using your dotting tool create two or three 'cloud' shapes on each nail, I dotted them on like flowers, a circle in the centre with 5 dots around it. If it needs another coat wait for them to dry then go over the clouds again. You can do these however big or small you like!


Step 3
Once your clouds are dry grab your paint brush, again if you can't find a paint brush just use a toothpick, draw two or three small lines towards the edges of the clouds. If you are feeling artistic you can draw actual tiny leaves.


Step 4
using your medium pink polish and a paint brush draw a circular shape in the middle of the clouds and in between all the leaves. They do not have to be perfect, the more odd edges the better as these are meant to represent the roses.


Step 5
Clean off your paintbrush using nail varnish remover and take your light pink nail varnish. Create round shapes in the centre of the flower. Then clean your brush again and take your dark pink varnish. Create one or two small 'C' shapes in each flower. Completing this step will give your flowers a bit more definition and make them look more impressive!  

Add a top coat and voila, you're done!


I love this nail design I think it's so pretty and girly, as you can see it's really easy to do as long as you have a steady hand and the patience to wait for your nails to dry after each step! One mistake I made that I would reccommend you do is ADD A TOP COAT! I forgot and because there's so many layers of polish on the nails the design chips really easily and I think a top coat would help out with this a lot.

As you can see I left out the tiny dots outlining the flowers, I initially added these in using my smallest dotting tool but i thought it looked a bit messy and took the attention away from the flowers so took them off again!

Please send me pictures if you do replicate this on either facebook, twitter or instagram (@bethanvickery)

:)


Thursday, 7 March 2013

5 Healthy Smoothies Under 200 Calories!

When you're on a diet it's very hard to find snacks that subside your hunger but keep you within that dreaded calorie limit, especially when you're busy. I find that eating fresh fruit makes you feel really healthy and happy however if you are eating the same things day in day out it can get pretty boring.
 
 
That is why I have found 5 smoothie recipes that not only taste amazing but are all under 200kcal per serving! This way you are still eating the fruit which is diet friendly but it mixes it up a little for you so you don't get as bored!
 
Smoothie number 1
Cherry Vanilla Smoothie
serves: 4
calories per glass: 187
 

 What you will need:
1 cup non fat milk
2 cups frozen cherries
2 cups frozen raspberries
2 cups low fat vanilla yogurt
1/2tsp vanilla extract (optional)
2 cups ice
 
combine ingredients together in a blender until smooth
 
 
Smoothie number 2
Berry Good Peach Smoothie
serves: 2
calories per glass: 194
 
What you will need:
 
1/2 cup apple juice
1/2 cup non fat vanilla yogurt
1 cup peaches (fresh or frozen)
1/2 cup raspberries
1 1/2 cup ice
 
combine ingredients together in a blender until smooth
 
 
Smoothie number 3
Berry Banana Smoothie
serves: 2
calories per serving: 127
 
What you will need:
 
1 small banana, peeled, cut up and frozen
1/4 cup assorted berries, fresh or frozen
1 cup orange juive
3 tbsp non fat vanilla yogurt
 
combine ingredients together in a blender until smooth
 
 
Smoothie number 4
Blueberry Banana Smoothie
serves: 2
calories per serving: 133
 
What you will need:
 
1 medium banana, peeled, cut up and frozen
3/4 cup fresh or frozen blueberries
1/4 cup non fat vanilla yogurt
3/4 cup non fat milk
1/2 cup ice
 
combine ingredients together in a blender until smooth
 
 
Smoothie number 5
Banana Berry Cooler
serves: 2
calories per serving: 124
 
what you will need:
 
1 medium banana, peeled, cut up and frozen
1/2 cup fresh strawberries
1/2 cup orange juice
1/2 cup non fat vanilla yogurt
1/2 cup ice
 
combine ingredients together in a blender until smooth
 
 
What I love about these smoothies is you can pretty much add whatever you want to them, if you don't like banana have raspberries if you don't like yogurt have milk! My favourite out of all the smoothies is the Banana Berry Cooler, it's delicious and so refreshing. I will definitely be drinking a lot of these when the summer comes! They're also good to stick in the freezer and either eat as a frozen yogurt or simply have another time. And they're great for when you're on the go.
 
:)
 

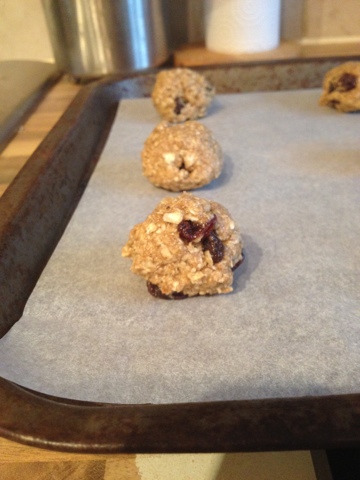
Healthy Oatmeal and Raisin Cookies


I was in the mood for baking today and as I'm on a healthy eating diet I wanted to make something that wouldn't use up all my calories for the day. I love Oatmeal and Raisin cookies and they, out of all flavours of cookie, seemed to be the healthiest so I gave it a whirl!
Below is the recipe and method for you to try them out yourselves, at 74kcal per cookie it's really not the end of the world if you DO give in to temptation once in a while.
 
 
All you will need is:
 
30g unsalted butter
90g brown sugar
100g golden syrup
1 egg
1tbs water
60g plain flour
1tsp cinnamon
1/2tsp salt
1/4tsp baking powder
140g oats
60g raisins


It's also handy if you have a stand mixer with a beater however it's not necessary.
 
Method
 
Step 1
preheat your oven to 190c
In a bowl(for your mixer) add the butter, brown sugar, golden syrup, egg and water and mix thoroughly
Step 2
In a seperate bowl seive your flour, cinnamon and baking powder then add your oats and salt. combine together using your hand.
Step 3
Add your dry ingredints to your wet ingredients and mix until just combined. Add your raisins right before the end and work them into the mixture.
Step 4
Grease your baking tray then weigh out the cookie dough at 20g per cookie. Spread them out evenly on the baking tray(s).
Step 5
Bake the cookies at 190c for 10 minutes or until the edges are golden brown. Once removed from the oven leave them to sit for at least 5 minutes before transferring to a cooling wire to cool completely.
 
And you're finished, Enjoy! Very easy to bake and even though they're only 74kcal per cookie they taste amazing!


Thursday, 17 January 2013

Winter Beauty Saviours

 
It's mid winter right now and we're all at that point where our skin is a bit worse for wear and our hair is dryer than ever, together with the help of some of my instagram friends I've found 8 beauty products that give us a bit of TLC in these cold months.

 
Firstly I chose this Herbal Essences 'Split End Protection Cream'. I have long hair which tends to become very brittle in the cold weather, I bought this when it was on offer in Boots but it retails at £4.70 for a 150ml bottle. I think this price is great because you get a lot of product for your money and a little bit goes a long way. It's basically a leave in conditioner that you can apply to damp or dry hair, I squirt about 3 pumps into my hands and then run it through the ends of my hair after towel drying it. So far I think it's brilliant and really has cleared up most of my split ends, it smells absolutely amazing of raspberries which is a bonus as the smell lasts ages. I really reccomend this for people who have particularly dry hair as it seems to lock in the moisture especially if you condition your hair in the shower beforehand. 


Next up are the Soap and Glory body scrubs! The picture below is courtesy of the lovely @hellobirdie_xo on instagram. These were favourited by several instagrammers including @hellobirdie_xo, @alfarrant and @ameliavickery. I've tried the sugar crush scrub before and it really does leave your skin feeling softer and hydrated and an added bonus is they smell incredible! Soap and Glory can be found at Boots, instore and online, one of the 300ml tubs of the Sugar Crush body scrub is £8 which may seem pricey for a shower product but they last for ages and are definitely worth the money.
 
 
Scrubbing away all the dry and horrible skin is all well and good but only if you then lock in moisture with an amazing moisturiser afterwards. I found it hard to choose one so I chose 10! If anyone knows me well they will know I am head over heels in love with everything body shop, I think I've probably tried pretty much everything they sell. I love their body butters and can't rave about them enough. My personal favourite is either the Pink Grapefruit or Strawberry. They smell incredible and the smell lasts on your skin for ages. One of the great things about these moisturisers for the winter is that they are ridiculously thick, so thick that I think in the summer it would take a lot of standing around waiting for them to sink into your skin, however in the winter if you have the patience to let them sink in they will keep you hydrated for a long amount of time. These retail at £12.50 each however The body Shop are known for their amazing all year round sales so can usually be found for less or on offer when you buy several! (There is currently a 25% off all purchase sale on www.thebodyshop.co.uk when you enter the code NEW25) I do think if you pay full price it is worth it as again they last for a very long time, I have 10 and not one is finished and some I've barely even started, these are going to last me a very very long time!
 
 
The next thing was chosen by Instagrammer @holliedollie26 and is this Lip Scrub from Lush. Now even though I am very loyal to the body shop I think this winter I really have been converted to Lush, the products are just so lovely, this lip scrub was one of the first things I bought from there and I am so glad I did. Firstly when you open the lid you get this overwhelming smell of bubblegum (hence the name) which I LOVE! However if this is not to your taste they also do a popcorn or mint flavour. I suffer quite badly from dry and chapped lips and when you try to apply lipstick it can look really awful, this lip scrub is a godsend, get a tiny bit on your finger and rub it in to the dry areas of your lips, when you feel it's done its job just lick it straight off! Not only does it smell great but it tastes great too, bonus! It helps lipsticks glide on and leaves your lips smooth and refreshed. These lip scrubs will put you out of pocket £5.25 for a 25g tub, totally worth it. 25g may not seem a lot but when you're using a tiny amount at a time it will last you longer than you think!
 
A few of us instagrammers were in agreement on the next one, it's MAC lipsticks! I chose the colour 'Cosmo' however @amyforre on instagram chose 'Rebel' a beautiful dark red colour and @hellobirdie_xo chose 'chatterbox' which is quite similar to cosmo except it's more of a rosy pink, she added that it was a 'bright lip to perk up dull skin in the winter' I think this comment fits MAC lipsticks perfectly, our skin can get dull and worse for wear in the winter and with these lipsticks no one would ever know. I think all 3 of these colours are perfect for winter and with MAC there literally is a colour to suit everybody. I love the colour cosmo, it's a dark pink perfect to wear out in the day, I feel it warms up your skin tone and applying this after the Lush lip scrub it glides on like a dream and lasts hours! These can be found in MAC stores/counters and online for £14 each.
 
The next one is one of my personal favourites. Being a baker I regularly have to cut my nails which I hate! When I get a bit of time off (like now!) I love that I can grow my nails again, I received this Sally Hansen Maximum Growth nail treatment from my sister for christmas and I must say it does work wonders, it genuinely speeds up nail growth and keeps them strong for ages. It exceeds any expectations I ever had for nail treatments. After using it for 2 weeks after christmas my nails were beautifully long and stronger than they ever have been before and I'm pretty sure it's down to this little miracle worker. I'm using it again now and I love the shiny finish it gives your nails. This can also be found at boots and is £4.75, so cheap for the quality of product you receive!
 
 
The next product is another one from Lush, I chose the Bath Bomb 'The Enchanter' as it is my favourite however I reccomend ALL lush bath bombs, I have tried quite a few since the beginning of winter and I am completely hooked I love them and am determined to try every single one Lush sells! @Chloooe97 on Instagram also reccomended a Lush Bath Bomb called 'Party Popper' check out all the bombs at any Lush store or at www.Lush.co.uk. I love them for so many reasons, firstly I love having baths, I love laying in the warm water when it's freezing cold outside, I love relaxing and seeing the steam come from the water, I love the smell of the bath bombs (which lasts the whole bath and more) even when the water is drained the bathroom is left smelling amazing, as is your skin! I love that the bath bombs aren't just for fun and they really do make your skin feel lovely, they act as a moisturiser and bath bomb all in one. I really love the fun factor, this is my favourite bath bomb as it looked so different in the bath to how it did to begin with, it was orange on the outside and once i popped it in the bath and the outer shell fizzed away it split into two halves, one magenta and one bright yellow, which both fizzed creating this amazing orange colour, and who doesn't like bathing in orange water!? If you want a surprise try the 'Golden Wonder' bath bomb! There are ones that are solely for fun and smell nice but there are also skin conditioning ones, relaxation ones, ones for babies, there's pretty much a bath bomb for all occasions and you know with lush they're made using quality ingredients, by hand, to the great lush standard we all know. The bath bombs range in price from approximately £1.50-£4.50 each.
 
 
Lastly these Body Shop Shimmer Cubes were chosen by @eloiseannekex on twitter. I have some of these cubes however mine are much brighter colours suited for the summer. I love the colours Eloise has chosen, she says they're everyday colours that give you a bit of 'winter sparkle' the warm pink and brown tones will really warm up your skin tone in the colder winter months and the shimmer in them means they are perfect for both day and night wear. What I love about these cubes is that they are pigmented... to an extent, if you want a light dusting of these colours then that is do-able using a fluffy eyeshadow brush sweeping across the lid or through the crease, using a more compact brush and packing more product on you can get a darker more smoky look and by adding a drop of water to these colours they transform into highly pigmented cream shadows that last for hours, perfect paired with a winged eyeliner and dramatic lashes on a night out. A set of four of these cubes cost £16 and can be found at www.thebodyshop.co.uk or in Body Shop stores.


Thank you to everyone on Instagram and Twitter who reccomended products, of course I could only write about the products I have tried and tested however below are the rest of the reccomendations, feel free to chat to one another about these products for further details and who knows we may all find a new favourite winter saviour!
 
Instagram -
 
@hellobirdie_xo said the YSL touche eclat foundation is the perfect winter foundation as it doesn't cling to dry patches. She also reccomends the Reve De Miel lip balms as they are perfect for solving dry cracked lips!
 
@alfarrant said anything soap and glory! She particularly likes the hand food moisturiser, the smoothie body milk moisturiser and the spray on moisturiser as it's perfect for those days when it's too cold to 'stand around naked rubbing moisturiser all over you' I really want to try the spray on one it sounds amazing.
 
@amyforre said Burts bees lip balm to prevent dry lips and a good moisturiser e.g. benefit!
 
@eleanorspain said she loves the body shop coconut oil for renewing dry hair. She said Balmi lip balms are amazing as you don't have to take your hand out of your glove to stick your fingers in a tub (so true) and it's mint which is nice and tingly in the cold. She also said the one thing she would never go without is a good toner at night otherwise her skin gets so dehydrated, she particularly loves botanics rosewater spritz as it's very hydrating, may have to try this!
 
@chloooe97 said strawberry and milkshake bubble bath/shower creme from lush as it leaves your skin so soft and smooth, she also reccomends soap and glory hand food, the ted baker body sprays as they smell amazing! And finally the born lippy lip balms from the body shop.
 
Twitter -
 
@eloiseannekex said she keeps make up to a minimum in the winter as her skin gets very dried out, she's loving the collection 2000 concealer from boots and the body shop shimmer cubes (shown above)!
 
@bryonyeleanorr said estee lauder day wear moisturizer and chanel rouche coco shine evasion lip stick as it's warm toned, another lovely colour to keep you looking great through the winter!
 
Comment below with your Winter Beauty Saviours and why you love them so much!
 
:)


Monday, 10 September 2012

Review: MUA eye shadows


If you've been reading my blog for a while you will know that I've already done a post on MUA, and you will also know that I absolutely love it! After hitting pan on a few colours in my first eye shadow palette I decided I wanted to get another... few. I originally only planned on getting one but when I saw they'd come out with a few new ones I really couldn't resist.

I got 4 palettes in total, 3 of which have the standard 12 colours and I got the only one they do that has 24 colours.


The one I originally planned to get is this one, the 'Undressed' palette, I wanted this one after I used my friends one and fell in love with the range of colours. I've read that this palette is MUA's dupe of the Urban Decay 'Naked' Palette and the palette I already have, 'Heaven and Earth', is a dupe of the 'Naked 2' palette, after looking at them again I completely agree with that statement, not all of the colours are the same but they're both really great nude palettes with a great variety of neutral colours, both matte and shimmery. The quality is also very similar to Urban Decay.
I love the colours in this palette, they're nice and warm and there's a really great mix of lid and crease colours. It also has two matte colours which the first palette lacks. I took some swatches of the colours to check out the pigmentation and as expected the shimmery and more glittery colours are BRILLIANT. I can't rave about them enough they come away so well and are SO pigmented. There is very little fallout on application and if they're like the others I've used from MUA they'll last for hours. In my opinion the matte colours are lacking the wow factor the shimmery colours have, they don't have the same amazing pigmentation and they're both quite dull, nothing like 'Naked' and 'Buck' found in the Naked palette, despite looking almost identical. I recommend this palette to people with brown eyes however unlike the 'Heaven and Earth' palette it does have a lot of colours that would suit all other eye colours as well!


Another thing I loved about this palette is what is written on the back. Only 2/5 of the palettes I have from MUA have this on so I'm guessing it's a new addition. There is a layout of the eyeshadows on the back labelling them Shade 1-12 and underneath is a small description labelled 'Mini Masterclass' of how to create an eye look using 3 of the colours, I've photographed the colours listed. Not only is this good for beginners but it gives you an idea of which kind of colours go where and you can experiment from there to see what works well with your eye shape. I think these palettes are fantastic for beginners, they're £4 so especially if you're younger and just getting into it they won't break the bank. This palette in particular is great for beginners because there are no wacky colours that may look a bit OTT if not blended out or mixed properly.


The second palette I bought is called 'Dusk till Dawn' I mainly bought this palette because of the 6 colours along the top row, there are some really nice warm pinky colours which is one of my favourite looks in my self, the colour in the top left is also a lovely highlight colour which I desperately need as I use them up so quickly. I would love if MUA came out with a palette with all creams, pinks and purples! I didn't think I was going to like the bottom row as much because I don't wear a lot of blues or blacks as I don't think they go with my eye colour or shape so I tend to avoid them. However, after seeing them in person I do love them! The black one in the bottom right corner is amazing and will look great on nights out just dusted into the outer half of your crease. It's packed full with glitter and again the pigmentation is phenomenal. the two navy colours are also really amazing and I think anyone with blue or green eyes would look great if they used these. 
The only thing I don't like about this palette is the teal colour that looks very out of place, it's so bright and I feel very off-putting to someone contemplating buying this palette. If you're looking for dark, night time colours, which this palette has, the teal colour instantly grabs your attention and makes this palette come across as a brighter more crazy-coloured palette. I think this palette would mainly suit people with blue or green eyes. If you're brown eyed like me and not very brave I wouldn't reccomend it as there are palettes with better colours suited to our eye colour, however if you're daring when it comes to dark and bright colours then it's perfect for you as the top colour is perfect for those more laid back neutral days and the bottom row is perfect for more dressier or night time occasions.


This is my favourite palette that I bought, it's called 'Glamour Nights' which is a perfect name for it. When I went on the MUA website this caught my eye straight away, the colours are simply beautiful and they're all shimmery which means they're all going to be perfectly pigmented. After one look I knew I was going to buy it but after getting it through the post and seeing it more clearly I knew it was a good decision, there are SO many different combinations that can be made from this palette, it has the perfect combination of bold/dark and light/neutral colours so there is a look for pretty much any occasion. As you can see in the picture I've already used this palette, I made a look out of the 3 colours in the top right corner, the dark taupe, sparkly purple and very light pink which looked so pretty all blended together. I will be repurchasing more of this palette to give away as presents because not only is it so versatile but it's also the palette, I think, with the biggest wow factor. It will also suit every eye colour so I might just stock up and give them away as birthday presents over the next year! Again this palette would be great for beginners who want a bit more colour and are more adventurous!

After putting everything in my basket and going to the checkout I realised I'd been given a FREE palette, the 'Immaculate collection' which is MUA's only 24-colour palette, I hadn't seen this offer advertised anywhere so had to buy then and there as I desperately didn't want to miss out. I also wanted to share with you guys how to get the palette so I kept removing things in my basket to see if you had to spend a certain amount to get it, after removing everything except the 'Glamour Nights' palette and still seeing the Immaculate collection still there I was so confused, where they giving it away with every order? I then removed the Glamour Nights palette, put some other random bits back in and when I viewed the basket again the Immaculate collection had gone! Turns out the deal is if you buy the Glamour Nights palette you get the Immaculate Collection free! What a brilliant deal! I wasn't missing out so bought them all ASAP. Unfortunately the deal has now expired, I don't know if it was a one day thing but I was so happy I managed to get it, make sure if you do buy from MUA you google to see if they have any promotion codes valid and hopefully people have informed you quicker than me!


This is the Immaculate Collection palette, it does contain some colours that are in other palettes but it has a large range of unique colours. I also like the mix of neutral and bright colours, not bad for free eh?! Unless you use the same colour everyday MUA colours do last a long time, they're a good size considering how little you pay for it. This palette would suit any eye colour and the brilliant thing about having so many colours is that you can make so many different combinations. One downside to paying full price for this product is that it is £8 compared to the other palettes at £4. Obviously you will pay more money for more colours but it would be nice to save a bit money buying in bulk because for the same price you could buy two seperate palettes that not only are easier to transport around but they might have better colours more suited to you. I can imagine this palette doesn't sell as well as the other smaller palettes.

This palette also has the instructions on the back:


As you may be able to tell I highly recommend MUA, I think it's a great brand with great products, it just needs a bit more advertisement so more people know of its brilliance!! Don't think that just because the products are cheaper than a lot of drug store brands it's going to be bad quality becsause it's not. These are some of the best eyeshadows I've ever used and if they were in nicer packaging and there was a bit more quantity wise I think they could easily sell at £10 per eyeshadow, not palette, single eyeshadow. Get in there now while they're still so cheap!

In total this came to £12... for 60 eyeshadows. You can't really go wrong can you? I also ordered this on wednesday night at 9pm and it arrived via Royal Mail Friday Morning, can't get much better than that!!

I love MUA and I want you to too!


Sunday, 2 September 2012

DIY: Make your own earrings!


A few weeks ago I was bargain hunting in my local town centre and I came across a pack of 8 earrings and backs that had plain metal circles on the front, I instantly visioned myself making little pretty studs and when I saw that the pack was 50p I knew it would be a crime not to purchase it! I also went to hobbycraft and picked up a few other bits and pieces, below is a list of all the things you will need to create your own stud earrings!
  • kitchen paper
  • Toothpicks
  • Super Glue
  • Earrings and backs
  • Anything you want to put on the front!

It can get quite messy so make sure your work space is covered in paper, the superglue is likely to get everywhere and you don't wanna ruin nice table cloths or clothes as it does not come out! The toothpicks are for precision, I didn't add it in but you might opt to use tweezers when applying each piece instead as it can be quite fiddly! The earrings and backs are obviously a must, I got mine at 'Tiger' but that is the only store outside of London so if one isn't accessable to you try Ebay or different craft stores near you. I got my selection of beads and decorations from hobbycraft, they're all metal and all flowers, each pack was £1 which is an absolute bargain! I originally wanted silver beads to fill in the middle of the flowers, finishing off the look, but I couldn't find any and am quite glad as I love the classy look the pearl colour gives.


Here is a step by step of how to create your earrings, you will soon find out just how easy it really is!


  1. Get a small amount of your superglue ready to use, I just put a small amount on one of the lids of the pots the beads came in. Act fast as the glue dries super quick!
  2. Apply the glue to the front of one of the earrings spreading it evenly.
  3. choose a bead and press it onto the centre of the earring holding it in place for 10 seconds! (It was hard to photograph this step with only one hand!)
  4. Add a bit more glue to the centre of the flower and pop in a bead, again press down firmly for 10 seconds and leave to dry for at least 5 minutes before putting your earrings in because you don't want to glue them to your ear!
It really is as simple as that and you create the prettiest pair of earrings! All of the equipment used here comes under £10 and depending on where you buy everything you could definitely get it under £5! This is around the same price as a normal pair of studs and just think, no one else will have them so they'll be completely unique and when people ask where you got them you can have pride in saying you made them yourself! They're also a great and very personal present to give to someone, I just love them! Plus they're really fun to make when you're in a creative mood.

My favourite pair that I made:


For any extra info or queries you may have just leave a comment below!
:)